On this page you can see all of the equipment i currently use for astro-landscape photography. Some of the purchase links also contain affiliate links where you can buy products at the same price, but i will get a small commission on the sale with which you will support my work. Some of the products also contain certain discounts that you get by entering the voucher code.
A big thank you to all the companies that support me with their products: Fornax Mounts, Sunwayfoto, Focus On Stars, The Heat Company, Silence Corner and TTasrtisian.

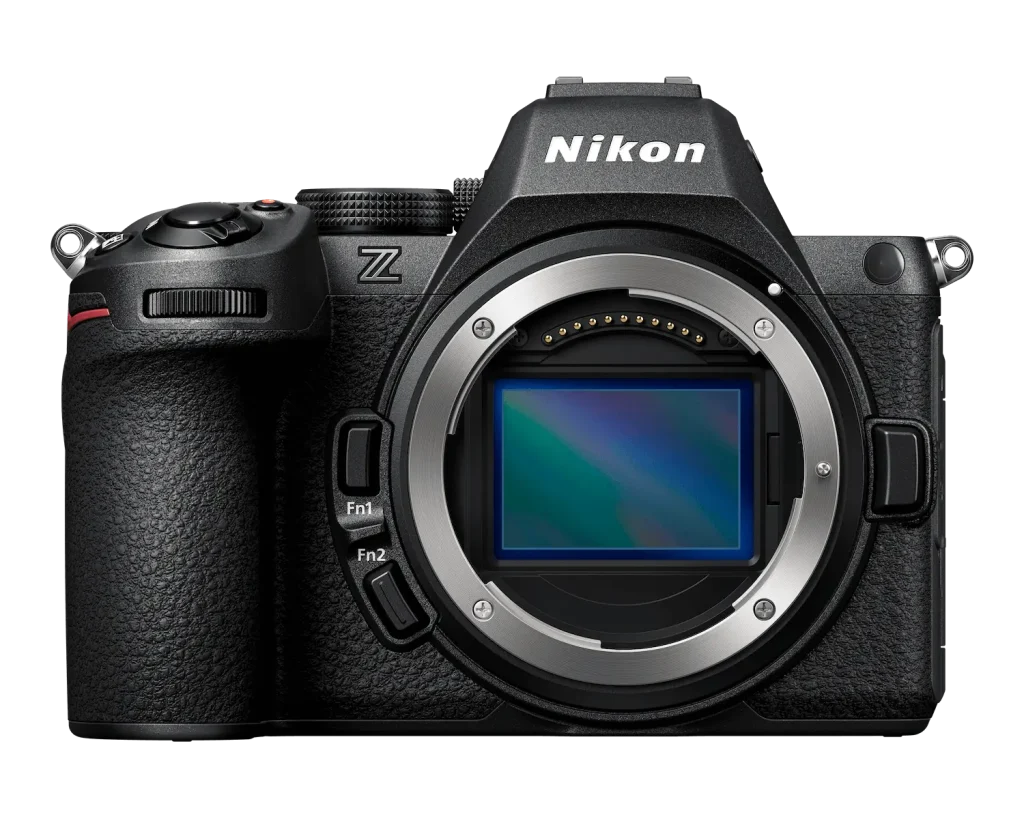
My favourite photography toy! With a 24mp sensor it can capture a sufficient amount of data with low noise. It is one of the best camera for astro-landscape photography on the market today ( 2024 ). I love everything about it, and wont replace it for a long time. It is astromodified by Astrolab Service with UV/IR cut filter ( H-Alpha ).
In late 2024 i replaced Z6 with Z6II, because of few additional features.
Extended internal shutter + type C charhing via powerbank + two memmory slots for backup.
My second Nikon Z6IIA, identical to the first one, and it is also astromodified with UV/IR cut filter ( H-Alpha ). I bought it because it allows me to shot multiple compositions during the night. And since I have two trackers, I can make full use of them.
In late 2024 i replaced Z6 with Z6II, because of few additional features.
Extended internal shutter + type C charhing via powerbank + two memmory slots for backup.

I am very suprised by the quality of this lens. The ratio price vs. quality is excellent. Stars in the corners looks nice even with wide open aperture. Probably one of the best, if not the best fisheye lens for astrophotography on the market today.

In the two years, since i have owned it, i have taken a lot of “deepscape” images with it. If you ask me, there is no better zoom lenses for astrophotography on the market today, especially not in this price range. It is very handy due to the large focal length range. The lens is very sharp and at f3.5 offers very good results from corner to corner at all focal lengths.

A lens that i bought as soon as it came on the market. After testing 4 best wide angle lenses ( Sony 20 1.8, Sony 24 1.4GM, Sigma 20 1.4 DG DN and Sigma 24 1.4 DG DN), this one was by far the best. We have to admit that Sigma has a lot of high quality lenses for astrophotography on the market. With this lens I can shoot with the shutter fully open and get very good results. Very good feature is also focus lock which stays in place even if you turn off your camera or camera goes to sleep.

This is undoubtedly the best ultra-wide lens ever made for astro- landscape photography. With its weight, size and incredible optics, there is no better primer ultra-wide lens on the market right now than this one. I can get incredibly good results even with a fully open aperture ( f1.8 ). From one edge to the other, the lens is as sharp as a razor, without chromatic aberration, the stars look very beautiful even in the corners, especially if we consider that this is an ultra-wide lens. However, as with all other lens companies, it is also true even with Sony that every copy of the lens is not perfect. Because of that it is necessary to do a test on the stars before keeping it.

This is my latest lens purchase. I really love this zoom lens from Sigma because its optically the same or even better then prime lenses and it gives me a more freedom with different focal ranges. With this lens i replaced two of mine prime lenses: Tamron 35 SP 1.4 and Nikkor Z50 S1.8. I mainly decided to replace them becuase i didnt have any lens from 20mm to 35mm range and now i can only bring one zoom lens with me instead of two primes. Plus the weight of this zoom lens is lighter then with two prime lenses.
Lately i am using this lens also for capturing Ha data with Nomad tracker.

As you have probably heard many times, the Samyang 135 f2 is the perfect and most used astro lens. You can use it for dso, “deepscape shots” or even some big mosaics where you would like to get out as many details as possible. If you get a good copy of this lens it is already perfect wide open at f2.0. from corner to corner of course with some vignetting on the edges.

This is a very unique lens which you don’t see very often! Actually this is the first full frame lens with such a wide focal range of 6mm and fast aperture f2.8.
With this lens i made quite a few unique shots already. You can see fewof my nightscape images i made with this lens on the BUY link bellow.
This lens gives you the 220degrees viewing angle, so in theory that means if you are gonna point your camera and lens up to the Zenith, you will be able to capture whole sky in one frame which is crazy! Or just point your lens in the direction of Milky Way and you will capture whole arch with landscape.
The only downside i can see are the black borders, because at the end you end up with circle image and not rectangle as we are used to. So if you want to get reed of this black borders, you need to crop it and you are gonna end with lower image resolution.

I just received this lens and still waiting to be tested under the stars. I do have a high expections for this lens. Its a great focal range for doing some close up shots, or even for timelapses or star trails shots. With the ultra-wide-angle field of view of 122.5degrees and f2.8 aperture it is a very interesting lens for astro-landscape photography.
What is also great is that you can buy it as Nikon- Z mount lens.

I am proud that with my work i can contribute one tiny part to such a successful company. Fornax Lightrack 2 is currently the most accurate portable star tracker on the market. The peak-to-peak unguided tracking error of the LighTrack is less than 2 arcseconds. At the heart of the LighTrack is the precision motor and the friction drive. The fine friction strip makes the movement of the mount very balanced. Its compact size, lightweight but robust body paired with outstanding tracking accuracy makes the LighTrack II an ideal choice in the market of portable trackers.

As soon as the Benro company announced this fully automatic head on the Kickstarter project, i decided to pledge it. To date, i have made many automatic panoramas, mosaics and various compositions with it. It nice because you actually have free hands and do not need to touch a device at all when shooting big panoramas. The accuracy of the tracking depends mainly on the accuracy of leveling under the head. It is good for focal range till 200mm, but i have already seen pretty good results made with longer lenses than 200mm. You can also create some motion time lapses, however the software itself will need some more upgrade.

In 2024 i decided to give it a go with this new star tracker from Move Shoot Move. Many thanks to the company for sending me this little magic device. I am really suprised by the size, its extra small, you cant even notice that you have it in the backpack. And the most important is that the tracking accuracy is really good for such a tiny device. For now i only tried few ultra wide shots and i can say that i am more than happy. This tracker is gonna be my tracker for longer hikes, where each gram is important. It is also very simple to use, with calibrated laser pointer you can do the polar alignment very fast and precise.

This equatorial wedge is something i wanted to have for a long time! It is simply outstanding! I replaced mine original Fornax wedge with this one and i couldnt be happier!
I wanted something lighter, smaller, but at the same time with very high quality. I modified this wedge with one more alu plate, so that now i can attach my Fornax tracker using only arca swis clamp, instead of using small screws to tighten the Fornax on original wedge. Its much faster to set it up!
This wedge is also much better and way more solid then SWSA wedge or Ioptron and MSM.
With its small size, and only 450g of the weight its a great companion on my nightscape advantures! I never go anywhere without those wedges!
It has 20 kg load capacity and its all made of aluminium.

Before i bought this wedge i was using equatorial wedge by Aktuhrashid for my smaller Nomad tracker. But i really wanted to try this new, updated version of MSM wedge.
I am positively suprised by the quality of this wedge. Everything works really smooth, its also very solid and sturdy. It can handle more then enough of payload, i could use it also in combination with Fornax Lightrack. I could say its even better then SWSA wedge ( which is normally shaky ), especially if you take into account size and weight.
I am very happy with this lightweight astronomy wedge which is a great companion for my Nomad tracker! Especially great for hikers, where each kg at the end is very important.
I can definitely recommend it to everyone who is using portable star trackers.

It is a versatile carbon fiber tripod with a high load capacity of 25kg which makes it perfect for astro-landscape photography. It is waterproof, solid and sturdy, very small when folded:51cm and lightweight: 1,5kg. I can recommend it to everyone who is looking for easy to carry, but at the same time very solid tripod with a good price.
VOUCHER CODE 5%: UROSFINK

With one word: Simply the best travel tripod i ever had!
If you do travel a lot or hiking on Mountains this tripod is a must for you. With its size when folded 48cm and weight 1.2kg you wont even know that you have it on your backpack. But the best thing is that this tripod is really solid and sturdy and it can be used even in some more extreme conditions!
I could not believe how good it is until i started using it. If i would need to pick only one of my tripods, that would be the one!
VOUCHER CODE 5%: UROSFINK

Because i do love hiking in the mountains and carrying heavy photographic gear with me i bought this smaller and lighter tripod.
I can safely say that Sunwayfoto has once again exceeded my expectations with this tripod! It’s incredible just how stable and high-quality the product is.
I bought it mainly because of its small folded size, low weight of just 1 kg, and practicality. However, I have to say that I can easily use it even with my heaviest setups for deep-sky photography with the Fornax mount. I genuinely recommend it to all photographers who like hiking in the mountains and want an as-light-as-possible yet incredibly stable tripod. It’s also perfect for traveling — I even took it to La Palma, where it showed no fear at all even in strong winds!
Just to mention: i never use extension tube. You can simply unscrew it and leave it at home in that way you loose aditional few grams.
VOUCHER CODE 5%: UROSFINK

This is a newest product from Silence Corner which will be launched soon on official website.
Unfolding the folding clamp, it can serve as a hook tripod, significantly enhancing the product’s versatility with multiple functions.
The unique hexagonal design provides the MAMBAPOD with a good grip, ensuring comfortable and stable use as a selfie stick.
The weight of MAMBAPOD+ Hollowed-Out Ball Head is 320g+160g=480g.
It can be used also in some extreme situations for Astro-Landscape photography where you are limited with space ( small caves, some fences where you can attach Mambapod and so on.. ).
For better understanding i would highly suggest you to watch some online videos about this product what else you can use this tripod for.

I bought this mini carbon fiber tripod mainly for longer hikes, to shot some composition with limited space and close up shots just above the ground.
And i can say that it came very handy for a few times already. I shot inside the small cave with it, where i could place my bigger tripods, i shot a lot of close up compositions where i needed to be clost to the ground. I also take it with me for a long hike on the mountains, and could simply put it inside my backpack without knowing its there ( 20cm folded, 0.5kg without ballhead and center column ). It also serve me as my third tripod when shooting a lot of compositions during some crazy nights. Working height can be adjust from 58mm to 660mm ( with center column ) without ballhead. Spikes and bag are also included. The quality of this small tripod is simply the best.
I am using it with included ballhead, which has good enough payload.
Its a really well spent money, and i can highly recommend it to anyone.

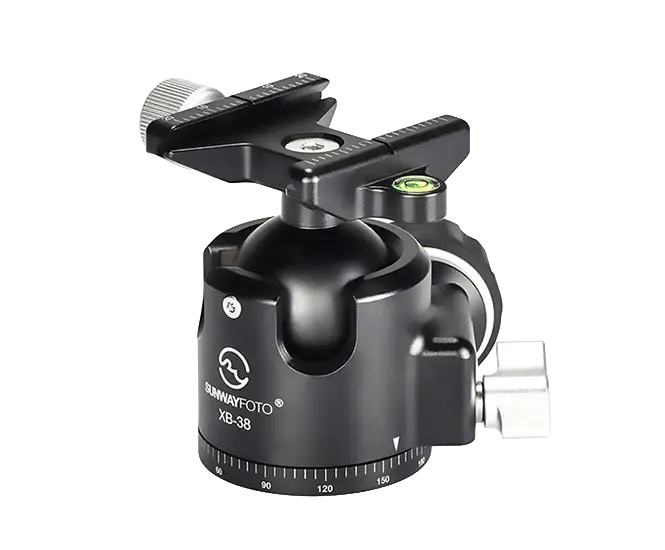
A piece of equipment that is indispensable for me. It serves me as leveling base for making big panoramas, or even as wedge for Fornax Lightrack 2. I am just in love in this Tilt head. It is very solid, stable, lightweight with high payload. You could use it instead of a ballhead also. I actually have two of them and i would not defend myself with a third one.
VOUCHER CODE 5%: UROSFINK

This leveling base made by Sunwayfoto is a piece of masterful equipment without which i do not go anywhere anymore. It s a perfect tool for faster assembly photography setup, easier balancing gear on top of it and it is also good for faster polar alignment and few other extra secrets using new built in pano rotator on top. Built in pano rotator is the main reason why i replaced my older Sunwayfoto leveling base with this new one. With a large platform diameter of 75mm and payload of 15kg is a great companion for my Fornax tracker. Also the weight of 350g is much better then with bigger 90mm leveling base. I also love the locking design of it.
VOUCHER CODE 5%: UROSFINK

This leveling base made by Sunwayfoto is a piece of masterful equipment without which i do not go anywhere anymore. It s a perfect tool for faster assembly photography setup, easier balancing gear on top of it and it is also good for faster polar alignment and few other extra secrets using new built in pano rotator on top.
With a large platform diameter of 68mm and good enough payload: 10kg is a great companion for my Benro polaris/Nomad tracker. The size of it is perfect, because i can fold the Benro polaris without touching/destroying the gear.
VOUCHER CODE 5%: UROSFINK

My latest equipment acquisition. Panoramic rotator with an option of presetting the desired degrees. With this tool i am gonna be able to rotate my cameras even faster while shooting panoramas. The quality of the product and material used is at the highest possible level. With 5,10,12,24,30 preset degrees i am gonna be able to use it for focal length all the way from 14mm till 150mm without having to use headlamp or looking for how many degrees i need to rotate my panning clamp.
Since i do have a lot of gear from Sunwayfoto, I knew I couldn’t go wrong with this purchase. I wanted a lighter and more compact ball head than the XB-44DL model, so I decided on this one. The build quality is truly top-notch, and the ease of use combined with its high load capacity is the cherry on top.
I use it for deep-sky astrophotography with telephoto lenses. It has practically replaced my previous, larger ball head. With this change I’ve reduced the overall weight of my gear, but I haven’t lost anything when it comes to stability! Goal achieved!
VOUCHER CODE 5%: UROSFINK

I bought this Neewer ballhead especially for my Nomad tracker. Why? Bacuse i wanted something lighter, smaller, but at the same time good enough to carry wide angle lenses without any problem!
And now after few month of usage i can say that this ballhead exceeded my expections! It really so small and tiny compared to the bigger Sunwayfoto 44mm i do have. But its very well made and solid! I think that for this money you cannot get a better ballhead then this one is! And with 15kg of payload you can even use some telephoto lenses + it also has a 360 rotation at the bottom, which is very useful when doing some Deepscape tracked shots with the Nomad tracker, where you dont have a rewind button!

Superior Low-Profile Ballhead ia a great addition for my astrophotography expeditions.
I love using it for single shots or some deepscape with my Fornax Lightrack 2i tracker where everything needs to be as good as possible and each piece of gear counts at the end.
Whole center of gravity is lowered more then 15% compared to traditional ballheads. This is actually pretty important, because we want to have our cameras as low as possible above the star tracker for better stability and even more precise tracking. With 25kg of payload i can put on this ballhead as much as i want. Two drop notch design also comes handy, because i can point my camera in more direction without needing to rotate panning base of the ballhead.
Special structure makes it the lightest of its class, knobs are made of metal for reliability and long use term.
Screw/lever combo of the arca-swiss clamp is very easy and fast to use in the night time.
I love using this ballhead, and i didnt have anykind of problem with it till now. I highly recommend it.
VOUCHER CODE 5%: UROSFINK
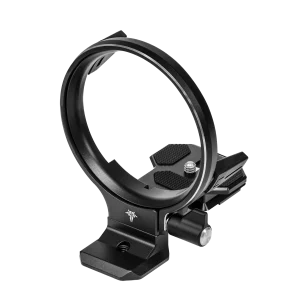
This is a neewer model of Atoll, which is even better then older versions! With two detachable extended brackets Atoll maintains high stability even when it is positioned father from the camera body! At the same time this gives you an option to access all of the buttons on your camera without any problem. With two new stability supports its now even more stable, which is something i really wanted to have for more extreme photographing conditions.
It also have a new aluminium alloy knob to easier operate your camera.
I would highly recommend you this model of Atoll if yow want the best stability and access to all the knobs of your camera body! I never ever put down Atoll from my camera!
One of my most difficult, but at the same time one of the best purchases of photography equipment. Difficult, because it was hard for me to shell out so much money for a backpack, and good because i cannot imagine going anywhere without this photographic backpack anymore. With 70L of space and XL insert this backpack is big enough to carry almost all of my gear on this list of my gear. With one word: Perfection!

This is my newest hiking backpack, which I bought for one main reason: to carry my heavy photography gear in the mountains more comfortably and with less strain.
We all know that photography backpacks, which are primarily designed for carrying camera equipment, are not as comfortable as proper hiking backpacks for several reasons. For a long time, I was searching for that “perfect” hiking backpack into which I could fit all my photography gear, lenses, food, and drinks, while still not feeling the heavy weight when carrying it.
And I can tell you, the Gregory Baltoro Pro 75 was truly an excellent choice! Carrying the gear feels like day and night compared to the Shimoda x70.
I also really like the full side-opening on the front of the backpack, where I can easily access all my equipment. Inside the backpack, I inserted an F-Stop Pro Large ICU for extra protection and security.
I warmly recommend it to all aspiring photographers who carry their heavy gear into the hills and on longer hikes!

These are additional pouch bags for carrying any kind of gear or even clothes. If i am running out of space in my Shimoda backpack, i tie them at the bottom and sides of the backpack. They are very convenient for few day photography trips.

Easy to Use The extendable design helps you to easily and quickly retract your filters. Magnets are used to automatically close the case and free your hands.
The square filter housing is made of wear-resistant and durable leather, weight is only 124 g. The square camera lens filter bag contains 3 pockets, each bag can hold 1 square lens filter up to 100mm x 100mm x 2mm. Actually i can store 4 of mine square filter because it has one more additional space in front.
If you want to have your filter protected from any kind of falls or accidents thats the case you need to have! I am really happy with it, its very hard on the outside, and soft on the inside so all of the filters are placed safely inside!
I do have 2x Lee soft filter and two Focus on Stars 100x100mm filters.
Would highly recommend this case to anyone who is using 100x100mm square filters!

The extra weight bags are especially useful when you need extra stability, whether for a very long exposure, to counteract strong winds, or because the camera or lens is heavier than usual.
I am used to have tripod stone bags with me always! First of all they are great for placing your smaller accessories under the tripods. Like powerbanks, filters, and maybe some pouch bags with smaller stuff. But its also very good to have it with you if there is a windy night. They can save your long exposure frames or even your camera gear if there us a windy night. You just need to place some heavier rocks inside and everything will be more safe!

Pouches for storing smaller accessories such as cables, batteries, powerbanks, lens warmers, screws, remote shutters and so on…I put these pouch bags in my backpack always when i go out. In this way i am more organized at night and do not waste unnecessary time for searching smaller pieces of gear all over my backpack.

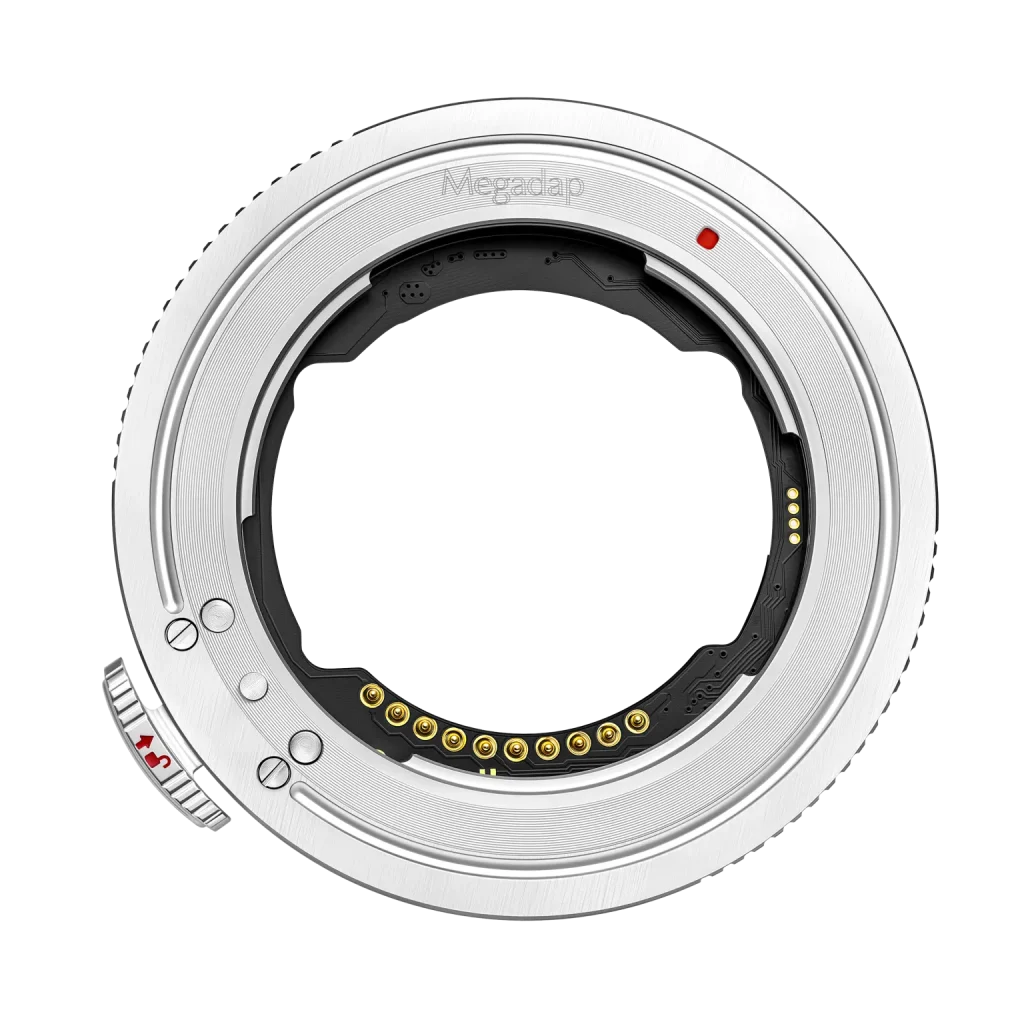
This is my latest acquisition in terms of adapters. Considering that I own 3 Sony E-mount lenses, it comes in very handy, because I don’t have to switch adapters from one lens to another. The advantage of this Viltrox adapter is mainly its lower price than the other two manufacturers.
It works very well with native Sony lenses, namely in manual focus mode, the focus remains in the same place even when you turn off the camera. While this does not apply to third party Sony-E mount lenses. It is also physically impossible to use the adapter with my new Sigma 28-45 f1.8 lens, while I can use it with the Sigma 20 Dg Dn 1.4 art, but with this lens the Focus lock does not work either. So focus lock feature does not work on third party Sony E-mount lenses either.

This is Sony E – Nikon Z Autofocus Adapter. With this adapter i can use all Sony E mount lenses on my Nikon Z6 without loosing any optical quality. With using this adapter lenses loose their functions, such as FN button, focus does reset when the camera goes to sleep or when you turn it off despite the focus lock function. While AF and all other functions like exif data are working good. It is very thin, and you need to be careful with it to not brake it.

Sony E – Nikon Z Autofocus Adapter. It has the same role as the Techart, only that this adapter is even better. Focus lock function is working even if you turn your camera off, or camera goes to sleep, focus stays in the locked pre-set position, which can be a time saviour in the night time. Also AF is much faster than with Techart with all the exif data written in the camera. I have two of them because i do have two cameras and i am planing to buy some additional Sony E -mount lenses in the near future.

In 2024, I replaced mine older version FTZ adapters with a neewer model FTZ II because of one important thing. When using atoll, or any other lens collar ring, i dont need to screw it on the FTZ and change the height of the ring. In the middle of the night when i wanted to change the Nikon dslr lens with Sony mount lens there was a lot screwing, tightening. All of this takes time, and makes you nerves during the night. Now, with FTZII i dont need to do any of those steps, which is much faster.
+ FTZII is a bit lighter an not that bulky.

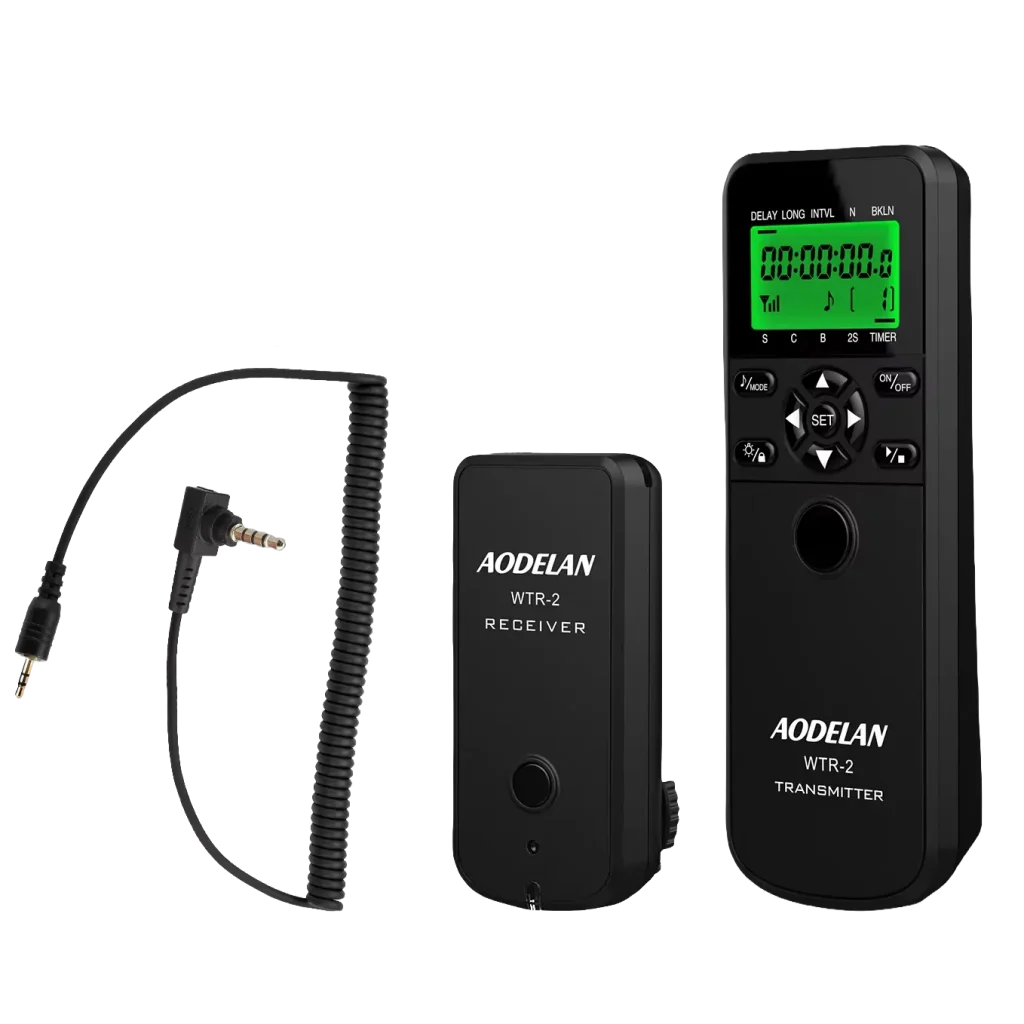
This is a smart remote trigger and intervalometer which is pretty new device on the market!
You can use it to control the camera wirelessly. You charge this device via Usb type-c with battery up to 150hrs which is just awesome. Of course you can see the battery life in SmartTimer app on your phone from where you operate the camera. The app itself is really easy to use and it works without any single problem, no glitches at all!
The best things which i do love about this device is that you can set the gap between the frames all the way to 0.1s, i tried with mine Nikons, and 0.3s is minimum gap for mine cameras which is much faster then with other intervalometers or internal camera shutter where the minimum gap is 1s. That means, when you are shooting star trails you wont have that big gaps between the stars.
The next thing i do like is how small and light this device is compared to Pixel tw283!
You can also shot holy grail timelapses with it, and it has new feature of lightning trigger for some storm chasers photographers! Team is also doing on updates constantly, so there is no worries about that something would not work!
Remote Control Wireless TW-283 allows you to trigger your camera wirelessly, up to a distance of more than 80 meters. I have two of them for my 2 Nikon Z6 cameras. Without this remote controller i cannot shot in bulb mode or longer than 30s. So this is a must have tool for long exposure photography if your camera does not support internal exposure longer than 30s.

This is my new lens defogging heater with temperature regulator. I bought it because i heard only good things about this product. Some of my friends have been using it for a longer period without any problems, even in very low temperatures. It fits lenses up to 41cm circumference, while cable is very long 2.2m including heat regulator which also comes very handy when shooting panoramas. I will be able to tell about the long-term experience a bit later.

On of the lightest if not the lightest headlamp on the market today. With maximum 360lumen output, CRI LED which produces a warm 20-lumen beam and renders colors and details better than cool white outputs, a secondary red LED for preserving night vision, three special modes (red caution/SOS/Beacon) for emergencies and signaling, long battery life and with rechargeable battery makes it great for astrophotographers.

My third lens heater is from Neewer company, and i could say its the best one of all three i own. Simply it works every time even in extreme cold environments, and looks very well made also.
It has temperature settings: a temperature controller offers 3 settings (high mode: 55-65°C; medium mode: 45-55°C; low mode: 35-45°C), to meet different weather conditions.
Usb cable is 1.5m long.

This is my backup headlamp. It has Large beam (200 lm) with 60 m range, rechargeable battery by micro usb, secondary red light for preserving night vision and not disturbing other photographers.

This step up cable will keep your device workable with a power bank. IC circuit will protect your device over load. It helps the cable in steady current&steady voltage, when your output or input is over the limit of the cable, it will lower the current to protect your devices. I need this step up cable to connect the Fornax Lightrack 2 to the powerbank. And till now i did not have any problems with it.

I have a few powerbanks because I do have two cameras with which sometimes i work at the same time. Two lens warmers, two trackers, Iphone.. All of this needs a lot of batteries to work smoothly over a night.
I recently bought 3x Klarus K5 carbon fiber powerbanks ultra thin fast charging power banks.
This is the lightest 10.000mah powerbank on the market you can get today ( 150g), and this is also the reason why i did decide to purchase those batteries.
Now that i have all my cameras with type-c charging, i can simply charge them with powerbanks, and i can shot all night long without needing to change the batteries.
After one year of usage i can tell you that power banks are not that good in colder temperature, neither i cannot charge 3 devices at the same time – to low power output.
Lately i am using it only for charging my Iphone when i am out on location. For charging my gear i am using UGREEN Nexode Power Bank 25000mAh 145W.

With this battery charger i can charge the batteries while i am on the go or even while i am shooting outside. It can charge two batteries at the same time, and the best is that i can connect it to powerbank for fast charging. Really good and cheap piece of gear which comes especially handy for few days trips where is no electricity.

Must have tool for photographers combines 9 fold-out tools with threaded storage holes to keep the screws within easy reach. It is handmade of stainless steel tools and an aluminium housing with the weight of 78g. It consists of a wide and narrow flat head screwdriver, a Phillips screwdriver PH1 and Allen keys H1.5, H2.0, H2.5, H3.0, H4.0, 3/16 + threaded holes on one side for as storage space for M2.5, M3, M4, M5 and 1/4″-20 screws. I love it! Super tool for night photographers.

A lot of people are asking me if i am using some additional H-Alpha filter, or some Light Pollution filter. So the answer is no, those are my first and only filters i started using them for astrophotography.
Probably those filters are the best filters on the market for astrophotography today.
Unfortunatelly they are out of stock, because Lee company dont produce it anymore. I did have a bit of luck, because i found a store which still had a few of those filters in stock. So now, i do have soft 4 and 5 to create some dreamy look effect on the stars. It gives bigger stars more pop-up, boosting colors and soft looking smaller stars.
I simply hold the filter with my hand in front of the lens. And normally i do create two frames: one without filter, and one with filter and a bit different settings.
You fall in love sooner or later when you see the final result.
You can only find few of Lee soft 4 filters in UK store.

When i upgraded my Nikons Z6 to Z6II i also bought new memory cards for both camera. Now that i have 2slots in camera on is gonna serve me as backup, in a case something goes wrong with one of the card.
My main card is now CF Express Card Type B from Lexar with really fast read/write speed and 256gb of space. While my second card is SDXC UHS-I with the same amount of space.

Focusing tool for Landscape and Deep Sky Astrophotography. Anyone who thinks that such a focusing tool are not needed has plenty of images that are out of perfect focus. If they are just little out of focus, stars may look sharp, but the chromatic aberration will show up on the lenses. It is very easy to use. I simply hold the filter in front of the lens with my hand, while with other one i am focusing. There are 2 different focusing filter: Wide for 14-50mm lenses and Telephoto for 30-400mm lenses.

I receive my MSM Nomad star tracker together with this tiny laser pointer. And oooh man i can tell you i love it so much!
Its smaller and lighter compared to other laser pointer, you can charger it vis usb type c cabel, you can calibrate it for more precise Polar Alignment. Laser needs to be screw on Nomad using laser adapter, and thats how the laser is safely in place. And the best thing is that with a bit of help of my friend, now i can screw this laser on my Fornax Lightrack 2i arm. This makes using Fornax tracker much easier and faster without needing to use polarscope.
I felt in love with this laser pointer so much and because i do have two trackers where i can use it, i ordered one more!

Simple led light panel in A5 format for easier carrying around. I am using this panel for creating flat frames when i am shooting with telephoto lenses. This led light pad has the same brightness across all the panel and because of that is very good gadget for creating flat panels. It also has adjustable brightness, very light and it is powering via usb cable.
I havent sold this light pad, but its laying in my room and collecting dust. I never shot any calibration frames, so because of that i never used it.

This is the only filter I use for night sky photography, besides the Lee soft filter.
With it, i can capture a lot of Ha signal, which later on i combine with RGB images.
I wanted to buy the best version of this filter ( MaxFR XT) because I shoot Ha at fully open apertures, from f/1.4 to f/2, depending on the lens.
The data from the raw shots is truly incredible, and with good Ha + RGB editing and blending technique, you can achieve fantastic results.
The filter has to be inserted directly onto the camera sensor, which means you have to remove the lens.
I usually shoot Ha data in parallel with RGB, so I operate two star trackers and two cameras at the same time.

I chose this power bank because it has a large capacity, and Ugreen is one of the leading companies in this category that has never disappointed me with their products. The same goes for their power banks.
With it, I can charge my camera while it’s running, lens warmer and Fornax Lightrack connected at the same time.
For one full night, I only need one power bank and one camera battery — and the battery never runs out.
Since I usually bring two cameras or two setups with me, I always carry two of these power banks. They also work excellently in winter conditions, well below 0°C.
Very satisfied with the purchase — I highly recommend it!

This is my favorite camping lantern. In reality, I don’t actually use it as a “camping lantern” — instead, I use it for self-portraits when I want to work with soft, diffused light.
The effect of this light is excellent because the beam is directed in all directions, creating a beautiful, even illumination.

I bought this camping lantern mainly because of its fun design, small size, and light weight. Unfortunately, in practice, it doesn’t work very well for self-portraits where I want to use the light.
The light is too strong even at the lowest intensity, and the color tone is also too white ( cold ).

Wow, this is one powerful flashlight! I’ve never seen anything like it in my life — when you press the button, night turns into day!
I bought it for two main reasons:
First reason: I often photograph deep-sky objects combined with terrestrial elements (churches, trees, castles). In these cases, I need to illuminate the foreground object to achieve precise focus. Shooting with telephoto lenses makes this very difficult. If the subject is 100 m away in complete darkness, you somehow need to set the correct focus on it. If you focus at infinity with a 200 mm focal length, an object which is 100 m away from camera will be out of focus.
That’s why this extremely powerful flashlight comes very handy. It has a beam range of up to an incredible 400 m with up to 6500 lumens!
Second reason: I use it when descending from the mountains or in dark locations when hiking back to the valley during a night time. With it, I feel much more safe with every step, because the strong light makes the path and surrounding significantly brighter.
This is my favorite camping lantern. In reality, I don’t actually use it as a “camping lantern” — instead, I use it for self-portraits when I want to work with soft, diffused light.
The effect of this light is excellent because the beam is directed in all directions, creating a beautiful, even illumination.

This is my latest acquisition as far as post production goes. Before i bought this expensive workstation i was working on a pc and one of the older macbook. I was unhappy with the performance of the pc which had pretty good components. When i was working on big projects, my pc often froze and it was pretty slow compared to my older mac. I have been so frustrated that i decided to invest my money in the best possible macbook so i can enjoy working on my projects. We, astrophotographers spend a lot of time with editing our images, and working on such a powerful machine is just amazing. It is much faster than my previous pc workstation, flawless and because i do a lot of work away from home, THIS IS AN INDISPENSABLE PIECE OF EQUIPMENT.

I recently bought the last version of the MacBook with an Intel processor 2019, which allows me to use a bootable Windows installation.
The MacBook has the highest possible configuration because the plugin Starspikes 4 is very resource-hungry and demands a lot from the computer.
It also serves me well when I want to do batch processing with Auriga Register software — especially when I have hundreds of meteors collected and want to register them into a big panorama. The speed really shows here, because Auriga Register doesn’t run as fast on the Virtual Windows Machine on my newer MacBook with the M1 processor.

The Calibrite ColorChecker Display Pro is an innovative calibration tool that gives you the speed and ample flexibility to achieve colour accuracy. Colour perfectionists know that it is crucial to work with a well-calibrated, profiled display for an efficient digital workflow. This means you spend less time perfecting colour fidelity, plus the colour of the image on the screen matches the colour of the final print. I am using this device a couple of times a year.

This is my new backup workstation with 48tb of memory ( 4x 12tb Western Digital red ). I did configure disks with Synology Hybrid RAID which means i have duplicated data on 4disks and 24tb of space for storing my data. I can access the data on the Hard Drive disks from anywhere and make a backups from my Macbook.
Compared to my older Synology ds220j, this one is much faster and i can access my data from everywhere much faster then with the older one.
Its a must have backup station for any more serious photographer and would highly recommend to anyone!

This is my enclosure for M2 ssd disk with type C connection. The case is made of aluminum with a magnet that can be attached to the laptop case. With it, we achieve fast data writing and reading (reading and writing speed around 1500mbps). It is also suitable for Photoshop as a cache disk for faster system operation. So far, I haven’t had any problems with it, but it is true that, like all portable enclosures for M2 disks, this one also heats up to a high temperatures.

Superior NVMe® Read/Write performance with speeds up to 3,500/3,300 MB/s. Althought i cannot achieve this speed using OWC external case its a great way if you want to have as high speed as possible on your laptop. I use it for projects and images i am currently working on. It serves me as backup disk before i am transferring all the data on Synology station, or even as scratch disk for Photoshop.

If you haven’t tried this illuminated keyboard yet, then you don’t know what you’re missing. Both, keyboard and mouse from mx master series are amazing. The keyboard is made of aluminium, the build quality is excellent, the responsiveness and the experience itself is perfect. One of the thing i love about this keyboard is smart illumination. Proximity sensors detect your hands, illuminating the keyboard at the moment your fingers approach. The backlit keys then fade off when you leave the desk which is perfect for my work, because i am editing my images in pretty dark room and i cannot see on keys without this backlit, but at the same time i dont like that lights shines on my screen thru all the time.
The built-in batteries in keyboard last very long ( at least one month in my case ). I can copy-paste files from one macbook onto another with using only mouse, and the same goes for the keyboard.

In this hard laptop sleeve case i can fit both of my Macbooks ( 16″ and 15″ ), with chargers, mouse, usb keys, external m2 case, hubs, ipad,etc…And the best thing about this bag is that it is made of very hard and solid material, which provides good protection against shocks or falls. The inner side is lined with soft material, which ensures that expensive computers stays in “as new” condition without scratching them.

This is USB C multiport solid expansion which i use with my Macbook pro m1 max. Because new M1 Macbooks do not have usb ports i need to use this hub. Its also great if i want to have more stable internet connection with using the cable instead of wifi.

If your workstation is like mine, ( laptop + main LCD ) then you need to have one of the stand for laptop with adjustable height and angle. I chose this model based on the positive reviews on Amazon. After a year of use I can highly recommend you to buy this model. It is very solid, very good manufacturing qualit all made of aluminium. It holds My 16inch Macbook in place without any problem in all possible angles.

10Gbps SUPER SPEED FOR CFEXPRESS CARD – BENFEI CFepxpress card reader is specially designed for CFexpress memory card (Type B) and supports USB3.2 Gen2 (10Gbps) super speed data transfer for your CFexpress card.In order to reach 10Gbps high speed,the USB/USB C port of your devices must reach the speed of USB 3.2 GEN2.

2 auto-lock buttons on each side allow easy quick height changes. The legs can be adjusted to 5 different heights (adjustable from approx. 24-32 cm). In addition, 2 snaps allow you to adjust the table top angle to 4 different angles (from 0-36°).
I bought this table because of my shoulder dislocation injury. I could move my right arm up, so this was quite a challenge to be at home for few months without being able to edit my photos. With the help of this table i could edit my photos directly on the sofa, and it serve me very good! Actually i love editing images on my sofa even when i am not injures, so its gonna be very handy even after recovery.
Its worth that money, for shure you can get better then this one is, but it serves me good for now, and the price is pretty small.
PixInsight is a professional-grade image processing software that is widely used in astrophotography for stacking, processing, and analyzing images. It offers advanced alignment and stacking features for astrophotographers that are ready to take on the complexities of such an advanced tool.
I am using it for all of my nightscape images, from ultra wide angle shots taken with 14mm lens, or some longer focal length shots. This is my must have program in editing workflow, and when i have started using it, my images suddenly looked much much better. It takes quite a lot of time to learn it, but it all pays off when you see the results. Two must have plugins for Pixinisght are from Russell Croman: Noise Xterminator & Star Xterminator.
The other one which also comes very handy from time to time are scripts by Herbert Walter which you can download for free here!
None of my images in the last two years have been edited without this software.
This is a bundle of Adobe program which i am using for post processing my nightscape images.
Adobe bridge serves me as file/folder organizer, and checking my raw frames and exif data.
In Camera raw i pre-edit raw frames so they are ready for further work, correcting mistakes on starless images, and also using it as filter layer while working in Photoshop projects.
In Photoshop i am running big projects ( sometimes projects exceed the size of 50gb ) and is a must have program for me.

Ptgui pro is a program designed for stitching complex panoramas. But not only that, inside this program you can find a lot of good features which will help you to get as smooth and nice looking panoramas without big errors.
It pretty easy for usage. I stiched all of my panoramas inside this program with success. Even if i fail a bit with shooting and small overlapping between frames i manage to stich them successfully. With a bit of hidden features and learning this program became your best friend for big panoramas. I already stiched an images with more then 80 frames with success. I also do love multi exposure “hdr” ability, which you can later blend different exposure panoramas in Photoshop using layers.

These are the two programs i use for stacking my pre-edit raw frames. I am using it for one year now, and i can say that the final result is much better then it is with Sequator on windows. What I like the most is that they are very easy and fast to use with good results of course. If one of this two is not working good, the other will. Either way, one is going to work for shure.
Starry landscape stacker is also very good with untracked stacking where you have a lot of trees, branches and complex foreground, because you can create a mask using brushes inside the program with function of detecting trees.

I use lrtimelapse in combination with Lightroom for night time timelapses. With it you can create smoother timelapses without to much flickering, edit them as you want using keyframe and grade together with Lightroom. With it you can create perfect Day-to-Night and Night-to-Day timelapse transitions, render the final clips in different formats and so on.

This is a program intended for video production and requires a lot of learning. But for some basics that I use myself, it’s great.
I mostly use it for the final editing of timelapses such as deflickering which is really amazing in this program , dynamic zoom, music, text, transitions, color grading, for motion control where all of my editing follow the path of the Milky Way or desired object, final rendering and so on…But lately i am not so oriented into timelapses, because it takes a lot of time for editing, and i simply dont have time.

From this bundle i mostly use only Topaz Denoise for the foregrounds. Its amazing and severe noise module is doing a great job on nightscape images. It is not so good for sky layers, where i prefer to use Noise Xterminator from Rusell Croman. But its doing great job with the foregrunds, especially on the water! Sometimes i miss a focus on the foreground, then i use Topaz Sharpen to correct it as much as possible without destroying it. You need to be a bit more careful with it, because you can quickly destroy your image instead correcting. Most of the time i use Noise and Sharpen at the beginning of editing images. I do not use Gigapixel, i bought it as bundle plugins for good value ( watch for black friday deals ).

From Nik Collection i am using only plugin called Color Efex. I usually use it somewhere towards the end of the project on a new layer in Photoshop. Sometimes I also make two versions and compare them with each other. I save some of my edits in Color Effex so i can maybe use it later with another images. I don’t use it for every photo, but I always try to see if I can improve something on my photo.

This is one of my first plugins that I started using in Photoshop. Mostly i am using only Action and Filter tab for sharpening image when exporting them for web, sometimes vignetting and Magic Green Landscape for better, smoother blending with subtle Orton effect. You can do a lot of stuff with this plugin. Also RGB masks comes handy sometimes, but i rarely use it.

I am using this plugin only when working with star trails images, otherwise i do not like such a plugins for editing my images. I prefer doing everything without presets and magic buttons. But it has some nice feature for star trails and that is also why i have it.

This is a plugin for Photoshop which can be be a very good simulator of Starglow filter. You just need to be careful to not over do it, otherwise the final results can be just awesome. I did use it with a few of my images, and I believe no one has guessed whether I was using the filter or just plugin. It is also very good to highlight the meteors.
One downside of this plugin is that is not Mac-compatible ( M-processors ). Even with virtual Windows machine this plugin cannot work.
And this is also one of the reason why i bought the latest Intel Macbook 2019, so i can run bootable windows and use this plugin in Photoshop if needed.

StarXTerminator is a tool to remove stars from astronomical photographs that works in Photoshop and PixInsight while NoiseXTerminator is a fast and easy-to-use AI-powered noise reduction tool. I personally run both plugins in Pixinisght software. I found that Starnet 2 does a better job on certain photos then Starxterminator, but in principle, however, Staxterminator is much better, especially for deep sky shots.
By using this plugins in combination with photoshop and camera raw, the quality of my photos has increased significantly.
I especially love the noise xterminator, with which I can quickly and effectively remove the noise.
BlurXTerminator is my latest plugin which i bought and you simply must have this plugin. In case you miss a focus on stars, or stars in the corners looks bad, this plugin can do the magic for you!
In any case, these are plugins that justify every euro to buy and they are also one, if not the most important plugins for getting better processing results with astro photos.
RegiStar is a toolkit for deep-sky imagers. It allows several images, possibly taken with different telescopes and cameras, to be processed into a final composite image. Operations require only minimal user input.
With help of this software i can allign all of my H-alpha frames with RGB frames.
I am using it also for registering meteors from different cameras captured during some meteor showers.
I also use it for aligning soft stars which i shot using lee soft filter with normal frames without filters. And i can say its working like a magic. Very fast and precise, you just need to press like 2-3 buttons and that is it.
And the great thing is that you can use it on Macbook’s M powered processors with VMware fusion software.

Hands down this are the best inner ( under ) layer gloves i have tried to date, and i tried quite a few different inner layer gloves. The gloves are so warm that sometimes i do not even need to put second layer on top of it. I can easily operate my gear and camera with them.
Interior is made of soft merino wool, while exterior is made of hightech fiber. There is extra pocket on the back of the palm for Heat handwarmers, Silicone print on the palm for non-slip grip + conductive textile on thumb, index and middle fingers to handle touch screens makes this gloves a must have gloves for night photography.
VOUCHER CODE 10%: urosfink23

These are the warmest gloves you can buy from the Heat company. They are made of 100 % goatskin. With simple method of folding down a thumb and mitten ( fix with magnets ) are ideal for handling the gear. With the combination of merino liner pro you can use these gloves in the coldest places in the world.
I know what it’s like to be outside in the winter at -10 degrees or even more thru all night and work with photographic equipments at the same time. With this shell full leather everything becomes more pleasant. There is also a pocket for carrying small tools or Heat warmers.
VOUCHER CODE 10%: urosfink23

This is the outermost layer of the Heat layer system. They are strongly wind and water repellent, made of 100% nylon with membrane coating. They are so thin and lightweight you wont know that you have it in your backpack.
Palm is equipped with silicone print for better grip.
With velvety soft fabric on the thumb you can wipe off glasses and displays without leaving scratches.
They are great if you have a lot of contact with the snow, or rain, so all the layers under this stays dry.
VOUCHER CODE 10%: urosfink23

This is one of the must have warmer for your winter photography expeditions.
I am shure you foot will stay warm thru all the night even in more extreme conditions.
Especially suitable if you stand in one place all night. They will warm your feet for 8+ hours at 40°C. 100% natural ingredients. I use them always when I spend a night in the cold or in the snow.
VOUCHER CODE 10%: urosfink23

This is my most wanted and used warmer at extremely low temperatures. I found that if i have enough warm feet and my lower back i feel very comfortable and i get a feeling of warmth all over my body. It will give you 12+ hours warm all around, its 100% natural. You can stretch the heat wraps effortlessly from 80 cm to 170 cm thanks to stretch material.
Like all warmers and insoles from Heat company they work in such a way that after opening the packaging, they activate themselves within a few minutes and are ready to use.
VOUCHER CODE 10%: urosfink23

Hand warmers can be used for many different purposes in night photography. They can be used with combination of Heat gloves ( extra pockets where you insert them ), or simply hold them in your bare hand. You can use them as a heater for lenses, tracking devices or even tripods for more comfortable carrying, etc.
They warm hands for 12+ hours, 100 % natural, instant heat within minutes. They are useable several years, if left unopened.
You can choose between two sizes ( normal & xlarge ). The smaller size is the one which can be used in extra pockets with Heat gloves.
VOUCHER CODE 10%: urosfink23

Samyang is a company where you never know how good copy of the lens you will get in your hand. The lens is small and light, convenient to carry, nice for timelapses or some close up shots. It has a bit more vignetting wide open, but the stars looks pretty nice also in the corners.
I just sold this lens not so long ago and will replace it with Sony 14 1.8GM.

This leveling base made by Sunwayfoto is a piece of equipment without which i do not go anywhere anymore. It s a perfect tool for faster assembly photography setup, easier balancing gear on top of it and it is also good for faster polar alignment. With a large platform diameter of 90mm and high payload: 25kg is a great companion for my Fornax tracker. I also love the locking design of it.
VOUCHER CODE 5%: UROSFINK
Read more about this tripod in my Review
I replaced this leveling base with new model: Sunwayfoto LB 90R with built in rotator on top.

It is a very short nodal rail which i used several times for installing the camera with ultra-wide lens on Benro Polaris automatic head.
I used this nodal rail when i did not have Atoll yet.

This is my older leveling base with 69mm of platform diamater. It still works great after 2 years of usage. Due to the smaller size of the platform diameter i kept it for my Benro Polaris tracker. It is strong enough, a bit akward locking design with knob with which you can hit the platform or gear above it. Maybe a bit too high, Otherwise it does its job.
I replaced this leveling base with Sunwayfoto LB68R.

One of the simplest yet satisfying panoramic head. I had two of this for making big panoramas, but not to0 long ago i replaced one of them with Ninja advanced rotator while i keep the other one for vertical rotation for panoramas. I have been using this rotator for two years without any problem. It is well made and cheap.
I dont use this big L bracket anymore because i changed my setup for tracked panoramas. This panoramic head was located directly on 3 legged thing L- bracket and served me for vertical rotation of my camera.

This is a panorama rotator which i placed under the tracker. It serves me for two purposes: With it i can find the Polaris ( North Star ) much faster than i would do with wedge only. I do not need to worry how i will place my tracker in advance, plus it is very handy for shooting tracked reflections in the water.
I replaced this rotator with leveling base which has a built in rotator: Sunwayfoto LB 90R.

Lens warmers are also a must have tool for astrophotographers. If there is a lot of moisture in the air, the lens will fog over a time and the images will suddenly become blurry. This lens warmers are great because they do not consume much battery, they are thin, but not so effective at very low temperatures.
After one year of usage, one of the warmers stopped working and i bought Coowoo usb lens warmers.

These are batteries that are connected to a powerbank for direct camera charging via the attached usb cable. With the help of these batteries, mine cameras can take pictures for 24 hours or even more. Especially suitable for longer timelapses and star trails in the winter time, when nights are very long.
NOT USING THESE ANYMORE BECAUSE I REPLACED BOTH MY Z6A FOR NEWEER MODEL Z6IIA WHICH HAS TYPE C CHARGING.

Simple green laser pointer with 100mw of power. I use it very rarely. I think i used it only 3 times in 3 years. Some of astro-landscape photographers use such a laser for easier finding the Polaris or even for polar alignment. And that is also my plan for near future. When i will have an adapter for Fornax polarscope arm, i will be able to use it on my Lightrack 2 for polar aligning. This method of PA will be precise enough for tracking with ultra-wide and wide lenses.
I REPLACED THIS LASER POINTER WITH NOVE SHOOT MOVE CALIBRATED LASER POINTER.

It is a multi-purpose nodal rail with slide. Together with this extension rail i also bought two Koolehaoda QR-50B double sided clamps which you can slide on nodal rail. I am gonna be using this for tracked sky panoramas with 2 cameras, ( not yet ) or even for shooting two different compositions of star trails and timelapses at the same time. High quality aluminum alloy is used to ensure a light weight and high strength support.
I DONT USE THESE GEAR BECAUSE I NEVER DID ACTUALY TRY TO SHOT WITH TWO CAMERAS SIMULTANIOUSLY.

The SD/XQD card reader adapter with two slots has been specially developed for photographers. Supports reading up to 2TB SD/Micro SD cards and 5Gbps 10 times faster than USB 2.0 (480Mbps), so you can transfer movies via USB 3.0 or to files in seconds. Backwards compatible with USB 2.0 / 1.1.
I dont use QXD cards anymore, because i replaced them with new CF Express Type B cards, thus i need a different card reader.
This is Wired Timer Remote Control for my cameras. I have two of this just in case if some of my wireless controller would stop working during the shooting. You have to be ready for anything.
I dont use this wired remote controllers anymore, because i bought Nikon Z6II which already have built in extended shutter and i dont need extra backup for this.

The QR11 L-bracket is incredibly versatile and can be used for a wide range of cameras because of its big size. It is a robust solution and allows switching between portrait and landscape modes.
I use it exclusively for making larger panoramas, where it serves me as a camera holder for vertical movements. You can see this setup in my YT video on top of this page.
I dont use this big L bracket anymore because i changed my setup for tracked panoramas.

With these adapters i can use all of my Nikon DSLR lenses on Nikon Z6a mirrorless camera. Optics and functions of the lens stays the same, the only difference is that the lenses looks even bigger with this adapter attached on them. It has a bit bulky design, would wish something like Megadap design, much thinner and easier to carry around without loosing too much space in my backpack. I have two of them, because i also have two Nikon Z6a cameras.
In 2024, I replaced mine older version FTZ adapters with a neewer model FTZ II

To my suprise i sold this lens. Even tho its optically amazing lens for astrophotography i sold it because i replace two of mine prime lenses ( Tamron 35 SP 1.4 and Nikkor Z50 S1.8 ) for one zoom lens: Sigma Dg Dn 28-45 f1.8. I wanted to extended the focal range all the way to 28mm becuase i was missing this wider focal range.
I sold this lens because i rether bought neewer Sigma 28-45 f1.8 zoom lens, because i do have more freedom by choosing different focal range.

This is my backup workstation with 16b of memory ( 2x 8tb Wester Digital red ). I did configure disks with Synology Hybrid RAID which means i have duplicated data on both disks and 8tb of space for storing my data. I can access the data on the Hard Drive disks from anywhere and make a backups from my Macbook. I will soon need to expand my storage and buy Synology with bigger capacity of 4 disks.
I sold this one in the year 2025 after 4 year of usage because i upgrade it with Synology 920+ with better performance and more space!

I loved this lens because it has a good performance, especially if you take into account the price. Plus its very light and its native lens for my Nikon Z6ii. But i sold it because i bought Sigma Dg Dn 28-45 f1.8 zoom lens and i dont need to bring two lenses with me anymore + i lower the weight if i compare it with two prime lenses.
I sold this lens because i rether bought neewer Sigma 28-45 f1.8 zoom lens, because i do have more freedom by choosing different focal range. And Sigma now replace two of my prime lenses.

I sold this lens ring because i already have a better versions of Atolls which i do like better then Sunwayfoto one.
I sold this lens collar because i prefer the neewer Atoll D+ for my Nikon cameras. Better stability with Atoll.

Nikon Z fc hides many convenient features for astrophotography. Besides that it has an apsc sensor ( 21mpx ), which adds a few millimeters to all of my full frame lenses. It also has some nice features like: integrated maximum shutter speed of 900s, direct charging via powerbank, movie timelapse, exposure smoothing, its very light and compact, sensor is also pretty good for astro …
I sold this camera, because i havent used it often. I will rether buy one more full frame camera later.

Like all other Tamron lenses, also this 85mm prime lens is worth every penny. The ratio between price and quality is superb. Nowadays you can get a used one at a very low price. I mostly use it for “deepscape” shots where i want to take a closer shot of object in the sky together with interesting foreground, or even to shot some bigger mosaics. I can use it at f2.5 with very good quality of the stars.
I sold this lens because its a bit old, i was having problems with aperture, would need to update it + i needed to use FTZ adapter in order to use it with Nikon Z6ii.

I bought this tripod because of excellent price to performance ratio. One of the best tripod for this price on the market. With 36mm of max tube diameter makes it very strong and can hold a huge amount of heavy equipment above it. I have been using it in the snow, under the water, in hot and very cold temperatures and it is working perfectly. It is my favourite tripod of all time.
I sold this tripod because now i do have three Sunwayfoto tripods which i really love and this Leofoto tripod was a bit too heavy and big for my work! I prefer to have a bit lighter and smaller tripods.

This leveling base made by Sunwayfoto is a piece of masterful equipment without which i do not go anywhere anymore. It s a perfect tool for faster assembly photography setup, easier balancing gear on top of it and it is also good for faster polar alignment and few other extra secrets using new built in pano rotator on top. Built in pano rotator is the main reason why i replace my older Sunwayfoto leveling base with this new one + it looks and feel even better. With a large platform diameter of 90mm and high payload: 25kg is a great companion for my Fornax tracker. The only downside is the weight: 550g, and because of that i replaced it with 75mm base. This one i am using now it only if i dont need to hike somewhere far. I also love the locking design of it.
VOUCHER CODE 5%: UROSFINK
I sold this leveling base because its too big and too heavy for my setups. Instead i bought the one with 75mm of diameter which is perfect for my Fornax lightrack tracker and wedge + its much lighter to carry around.

It’s a camera rotate tool. Like a tripod collar, but way more lighter, easier and faster to install and you can use it with almost all cameras and lenses. I use them instead of L-brackets. With it i can place my camera with lens in a more balanced position and easily access all the ports on my cameras. I can simply rotate my camera around its axis within a seconds. Its a perfect gadget for astro-landscape photographers with nice design and features.
I sold this one together with Nikon Zfc camera.

This is a classic ball head which i use for deep sky shots or “deepscapes”. With it i can quickly change compositions or find an object in the Sky. It is very solid, 420g weight and it comes with high payload of 25kg. It is a good choice for heavy equipment or telephoto lenses. After 3 years of use the head no longer runs so smoothly, and gets stuck a bit, but still works.
I havent sold this one because its broken 🙂

This is my older model of Macbook that runs on Intel processor. And this is also the reason why I kept it. Unfortunately we cannot run all programs and plugins on new M1 processors. I only use it for specific plugins. I installed windows on this Macbook, which I don’t run virtually, but as bootable windows.
From now on this is Macbook for my daughter 🙂 I replaced it with the latest Macbook 2019 Intel processor because it was really hard to work on this older one.

Benq SW 321C is considered as one of the best photographic monitors on the market. It covers 99% AdobeRGB, 95% P3, 100% sRGB. When i am editing images at home, this is my primary monitor. Macbook pro m1 max is connected with monitor via thunderbolt 2 which is also powering Macbook at the same time.
I sold this Monitor because it was just in my room collecting dust, i havent use it for a long time because i prefer to edit my images just on Macbook M1 screen. Still waiting to find better monitor for my work.